Freestyle Human Portrait Manipulation in Photoshop with cs6
Freestyle Human Portrait
Manipulation in Photoshop with Brush Painting and Layer Masking
In this tutorial, I will show you the steps I took to create this Freestyle Human Portrait Manipulation in Photoshop with Brush Painting and Layer Masking. We will show you how you can apply brush painting and layer masking techniques to create unique and interesting effect for your portrait manipulation.
Note: The Photoshop tutorial is done in CS6 – therefore some screenshot may have slighting different layout as in the earlier version. Some brushes are exclusive to Photoshop CS6.
Here is a preview of the final effect I have for this tutorial: (click to enlarge)
PSD File Download
You can download the PSD File for this tutorial via the VIP Members Area for only $6.95/Month (or less)! You will not only get this PSD File, but also 100+ other PSD Files + Extra Goodies + Exclusive Photoshop tutorials there. Signup now and get exclusive :) Find out more about the VIP Members Areas
OK Let’s get started!
To complete this tutorial, you will need the following stocks:
Step 1
Create a new document sized 1000px * 1000px with white background. Load the stone wall texture into Photoshop and select a portion as shown below:
Copy and paste the selection onto our document, resize it to fix the document size:
Use a soft eraser with 50% flow and opacity, erase the following portions of this texture layer:
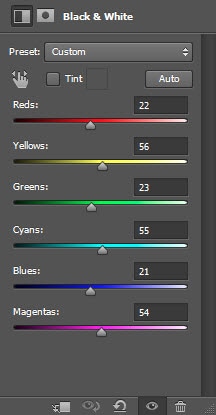
Add the following 3 adjustment layers on top of this texture layer:
Black and White

Levels
Curves
and here is the effect so far:
Step 2
Load the model image into Photoshop and cut the model out, paste it onto our document. Resize and position it as shown below:
Apply the following Surface Blur filter to this model layer:
Use a combination of soft and hard brush, as well as the debris brush, apply the following layer mask on this model layer:
and here is the effect so far:
Step 3
Add the following 3 adjustment layers as clipping masks to the model layer:
Black and White

Layer mask on the black and white adjustment layer:

Levels
Layer mask on this Levels adjustment layer:
Curves
and here is the effect so far:

Step 4
This is the fun part of this tutorial :) Let’s grab this “Round Fan Stiff Thin Bristles” brush, make sure you set the brush setting according to the screenshot below (click to enlarge):
Use this brush to paint some pattern on a new layer, to the area shown below:
We can also grab this “Round Paint Stiff” brush and paint something on a new layer:

Use the liquify filter to warp this painting so it forms a flowing pattern:

Attach this to the right eye as shown below:
Step 5
I decided to have a play with the hair area and add some effect to it. So I used the Quick Selection Tool with a 10px size setting:
Draw a selection of the hair area:
Fill the selection with white colour and use a soft eraser to remove the top portion of this fill, as shown below:
Change the blending mode to “Overlay”, slightly reduce the layer opacity to around 90%:
Duplicate this layer once and keep its blending mode as “Overlay”, move it down a bit to the forehead area:
Step 6
Ok we’re almost done. For some final touches, I painted some particles aroudn the model with the debris brush we downloaded earlier (make sure you reduce the brush size before you paint):
To add some more colour into the image, I added a Vibrance adjustment layer with the following settings:
and here is my final effect: (click to enlarge)
That’s it for this tutorial! Hope you enjoy it and find it useful! Till next time, have a great day!


No comments